Chidume
- "The React.lazy function lets you render a dynamic import as a regular component."
React.lazy makes it easy to create components and render them using dynamic imports. React.lazy is a function that is called with a function we want to load asynchronously:
The callback function must load a component using dynamic imports.
The React.lazy API returns the lazily loaded version of the component passed to the dynamic import call. The LazyComponent component will be loaded asynchronously, React will create a separate file for it, and it will be loaded independently. The React.lazy and the dynamic import call work hand-in-hand to make this possible.
When should you use React.lazy?
React.lazy is used for lazily loading React components. A React app is composed of many components, and it is often the case that a component is only used in a few places. Some of these components are used in the initial render of the app, and some are used in the render of a specific page. For example, a Modal that is used to display modals should not be loaded until the user clicks a button.
In this case, it is often more efficient to load the component asynchronously, and only use it when it is needed. This is because the component will only be loaded when it is needed, and it will only be loaded once.
So you should only use React.lazy when you need to load a component asynchronously. The component is not readily needed in the initial render of the app, and it is not needed in the render of a specific page.
Benefits of lazy loading React components
Lazily loading components is a great way to improve the performance of your app. It is also a great way to reduce the size of your bundle. It is also a great way to reduce the number of components that are loaded. It is also a great way to reduce the number of HTTP requests that are sent to the server. It is also a great way to reduce the number of components that are loaded.
React.lazy() and code splitting
Code splitting is the process of splitting the code of your app into multiple files. This is done to improve the performance of your app.
Code splitting breaks or splits your code into smaller chunks. This helps to reduce the size of the bundle loaded initially by the browser. This will help to improve the response time of the server, then the first contentful paint of the page.
Let's say you bundled your app and the final bundled size is ~900KB and ~1.2MB. This is huge for a lot of browsers. Loading a webpage of the file size will be very slow and reduce the performance of the app. It will take more than >1.5s before we can see the initial paint of the load because of the larger part of the time we will spend downloading the bundle.
Then, after downloading the bundled the browser will then execute the JavaScript. The JavaScript contains the JavaScript code of the framework you used, external dependencies, and your code. This will take a lot of time to execute because a lot of JavaScript was served initially to the browser.
The goal is to reduce the amount of time spent on executing the JavaScript initially and also the initial size of JavaScript. Code splitting answers this because it breaks the JavaScript into smaller chunks. This will reduce the size of the JavaScript and speed up the execution time the JavaScript. The ~900KB can be reduced to ~200KB, and this will reduce the amount of time spent on executing the JavaScript initially.
React.lazy as we have known does this by default for us in Reactjs. It will break the JavaScript into smaller chunks and load the chunks asynchronously. We can have hundreds of components in our app and we can have hundreds of files. The final bundle of the app will be ~1.2MB. To reduce the size of the bundle, we will need to lazy most components that are not readily needed, this is where the React.lazy API makes an entrance. It will split the components out of the final bundle and they will be loaded independently. Webpack does the magic behind the scenes.
How to lazy loading with React Suspense and React.lazy
We have learned that we lazy load components in React using the React.lazy API. Let's see practically how it is done.
Let's say we have this component:
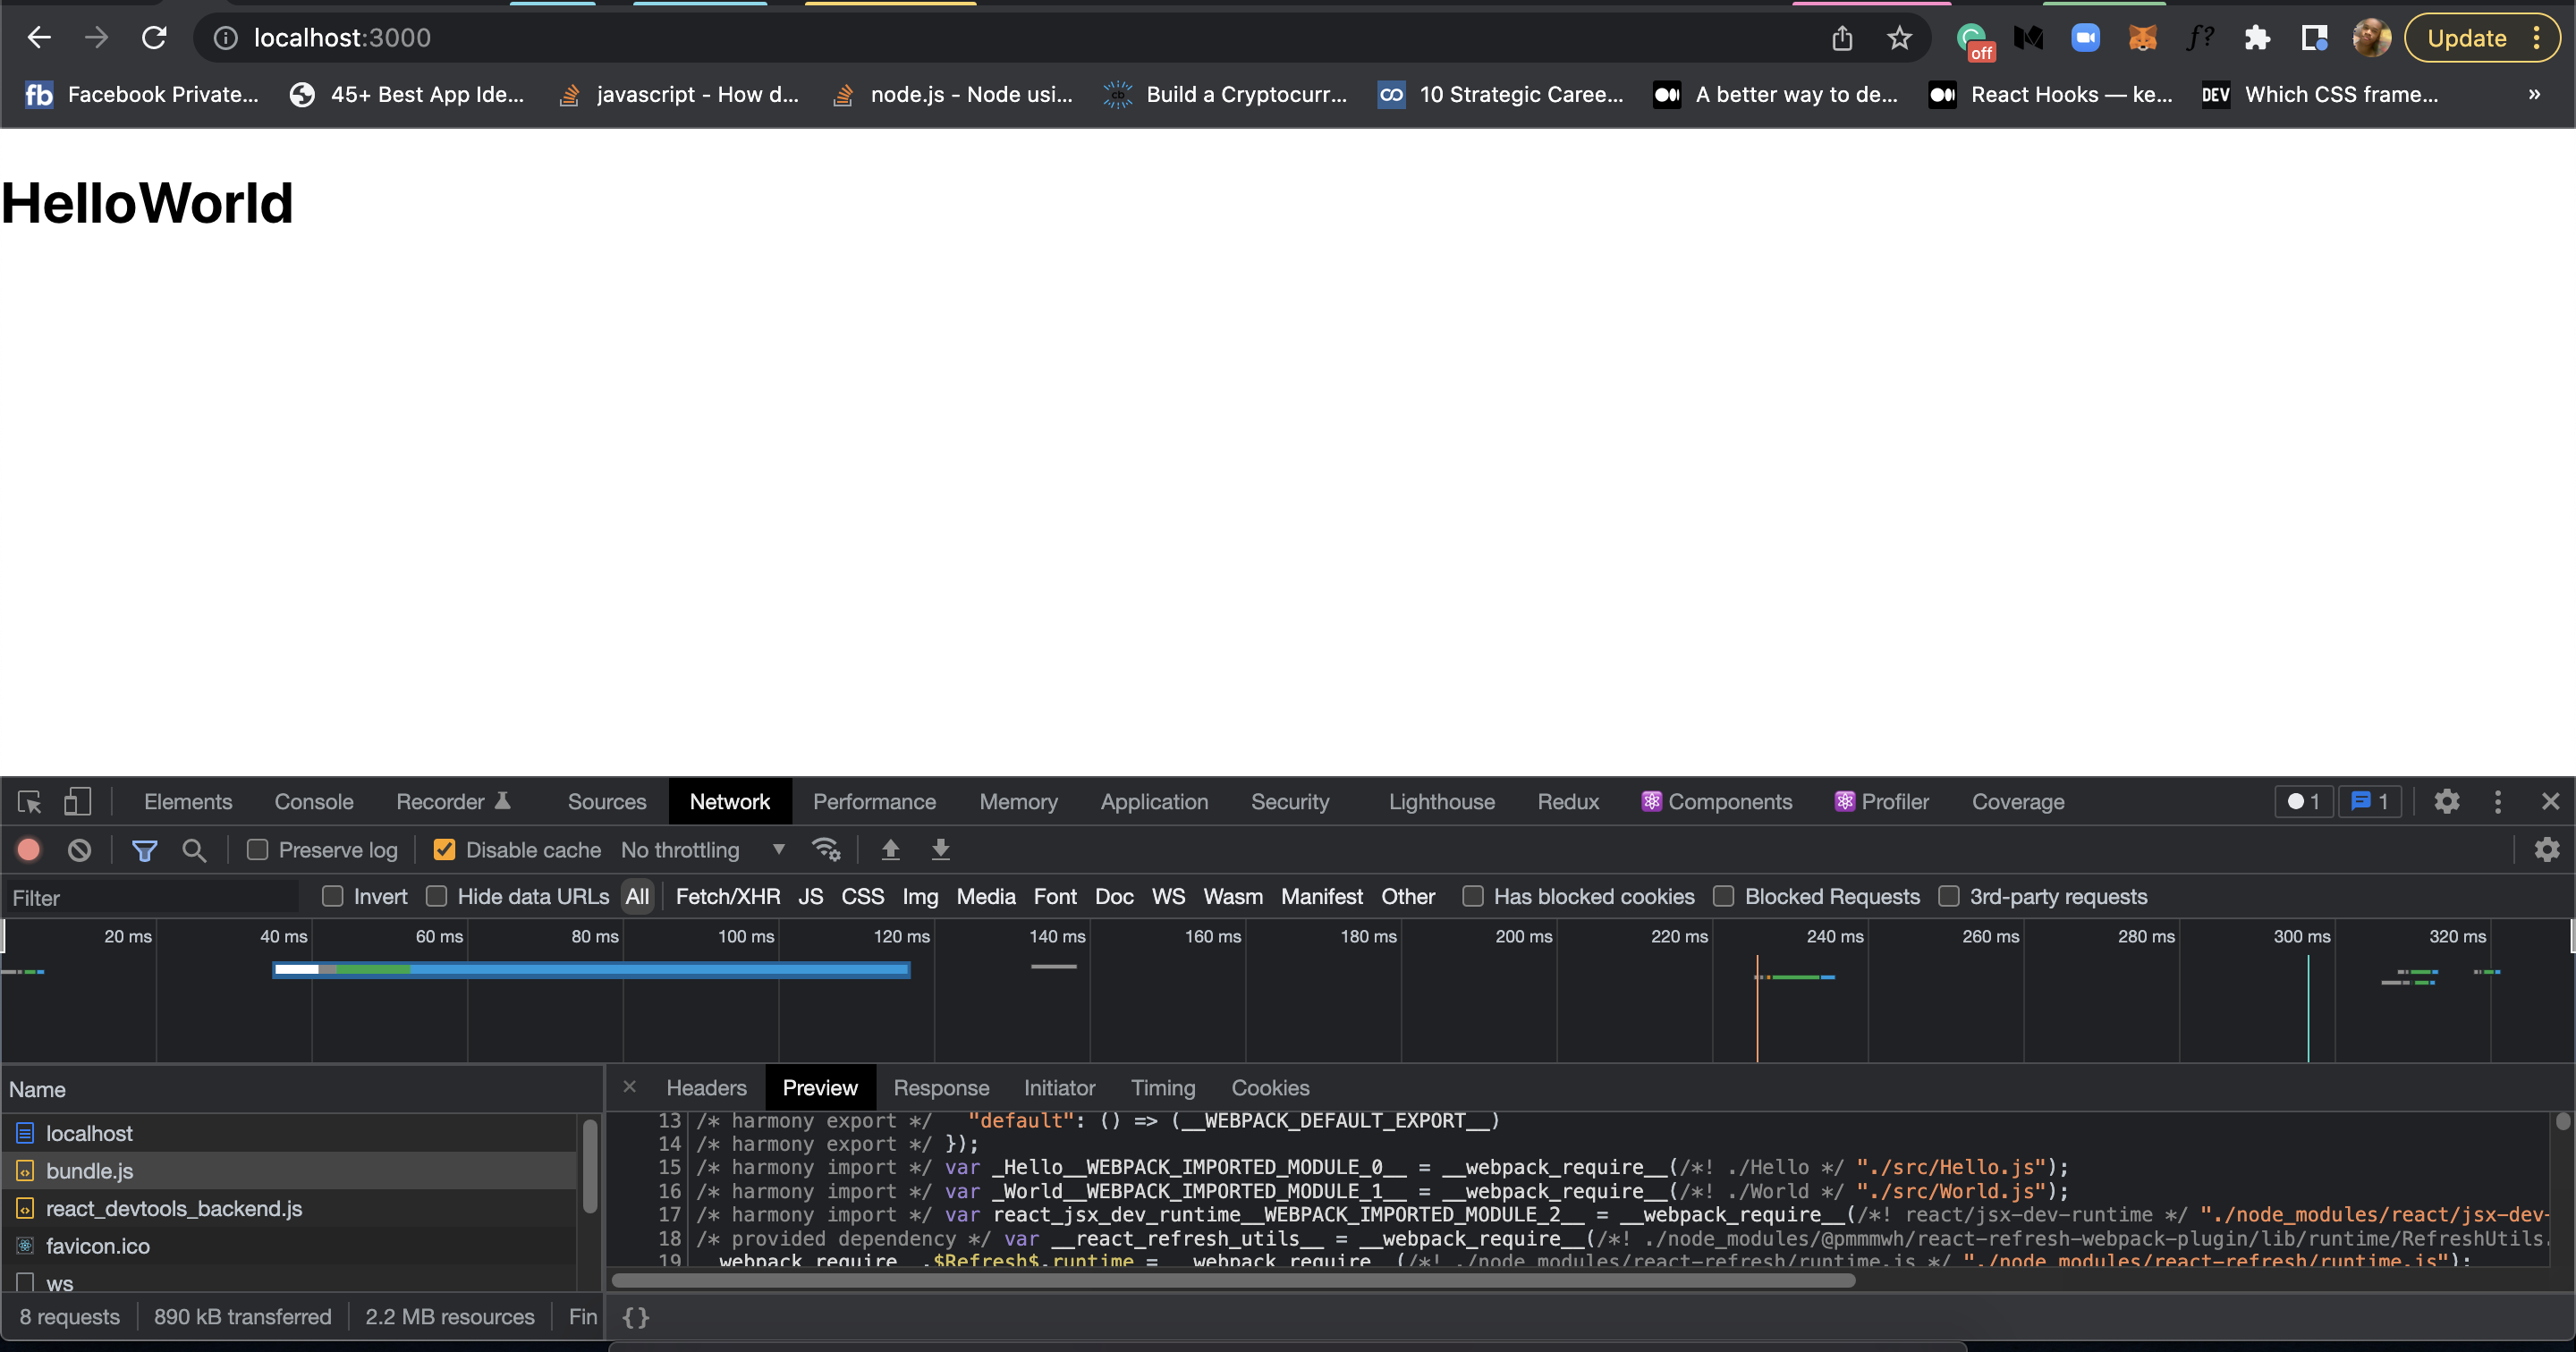
This component displays two components. The first component is Hello and the second component is World. Let's load the app in our browser. Open the DevTools and click on the "Network" tab. Click on the bundle.js file. This bundle.js file is the final bundle of the app. This is where the App, Hello, and World components are bundled.

You can see the App, Hello, and World components. If we want to code split the Hello component, we can do it by using React.lazy().
We can't render the Hello component on its own:
It must be rendered inside Suspense tags. The Suspense is a component exported by the react library. So we will import it:
Then, we render the Hello component inside it:
The full code:
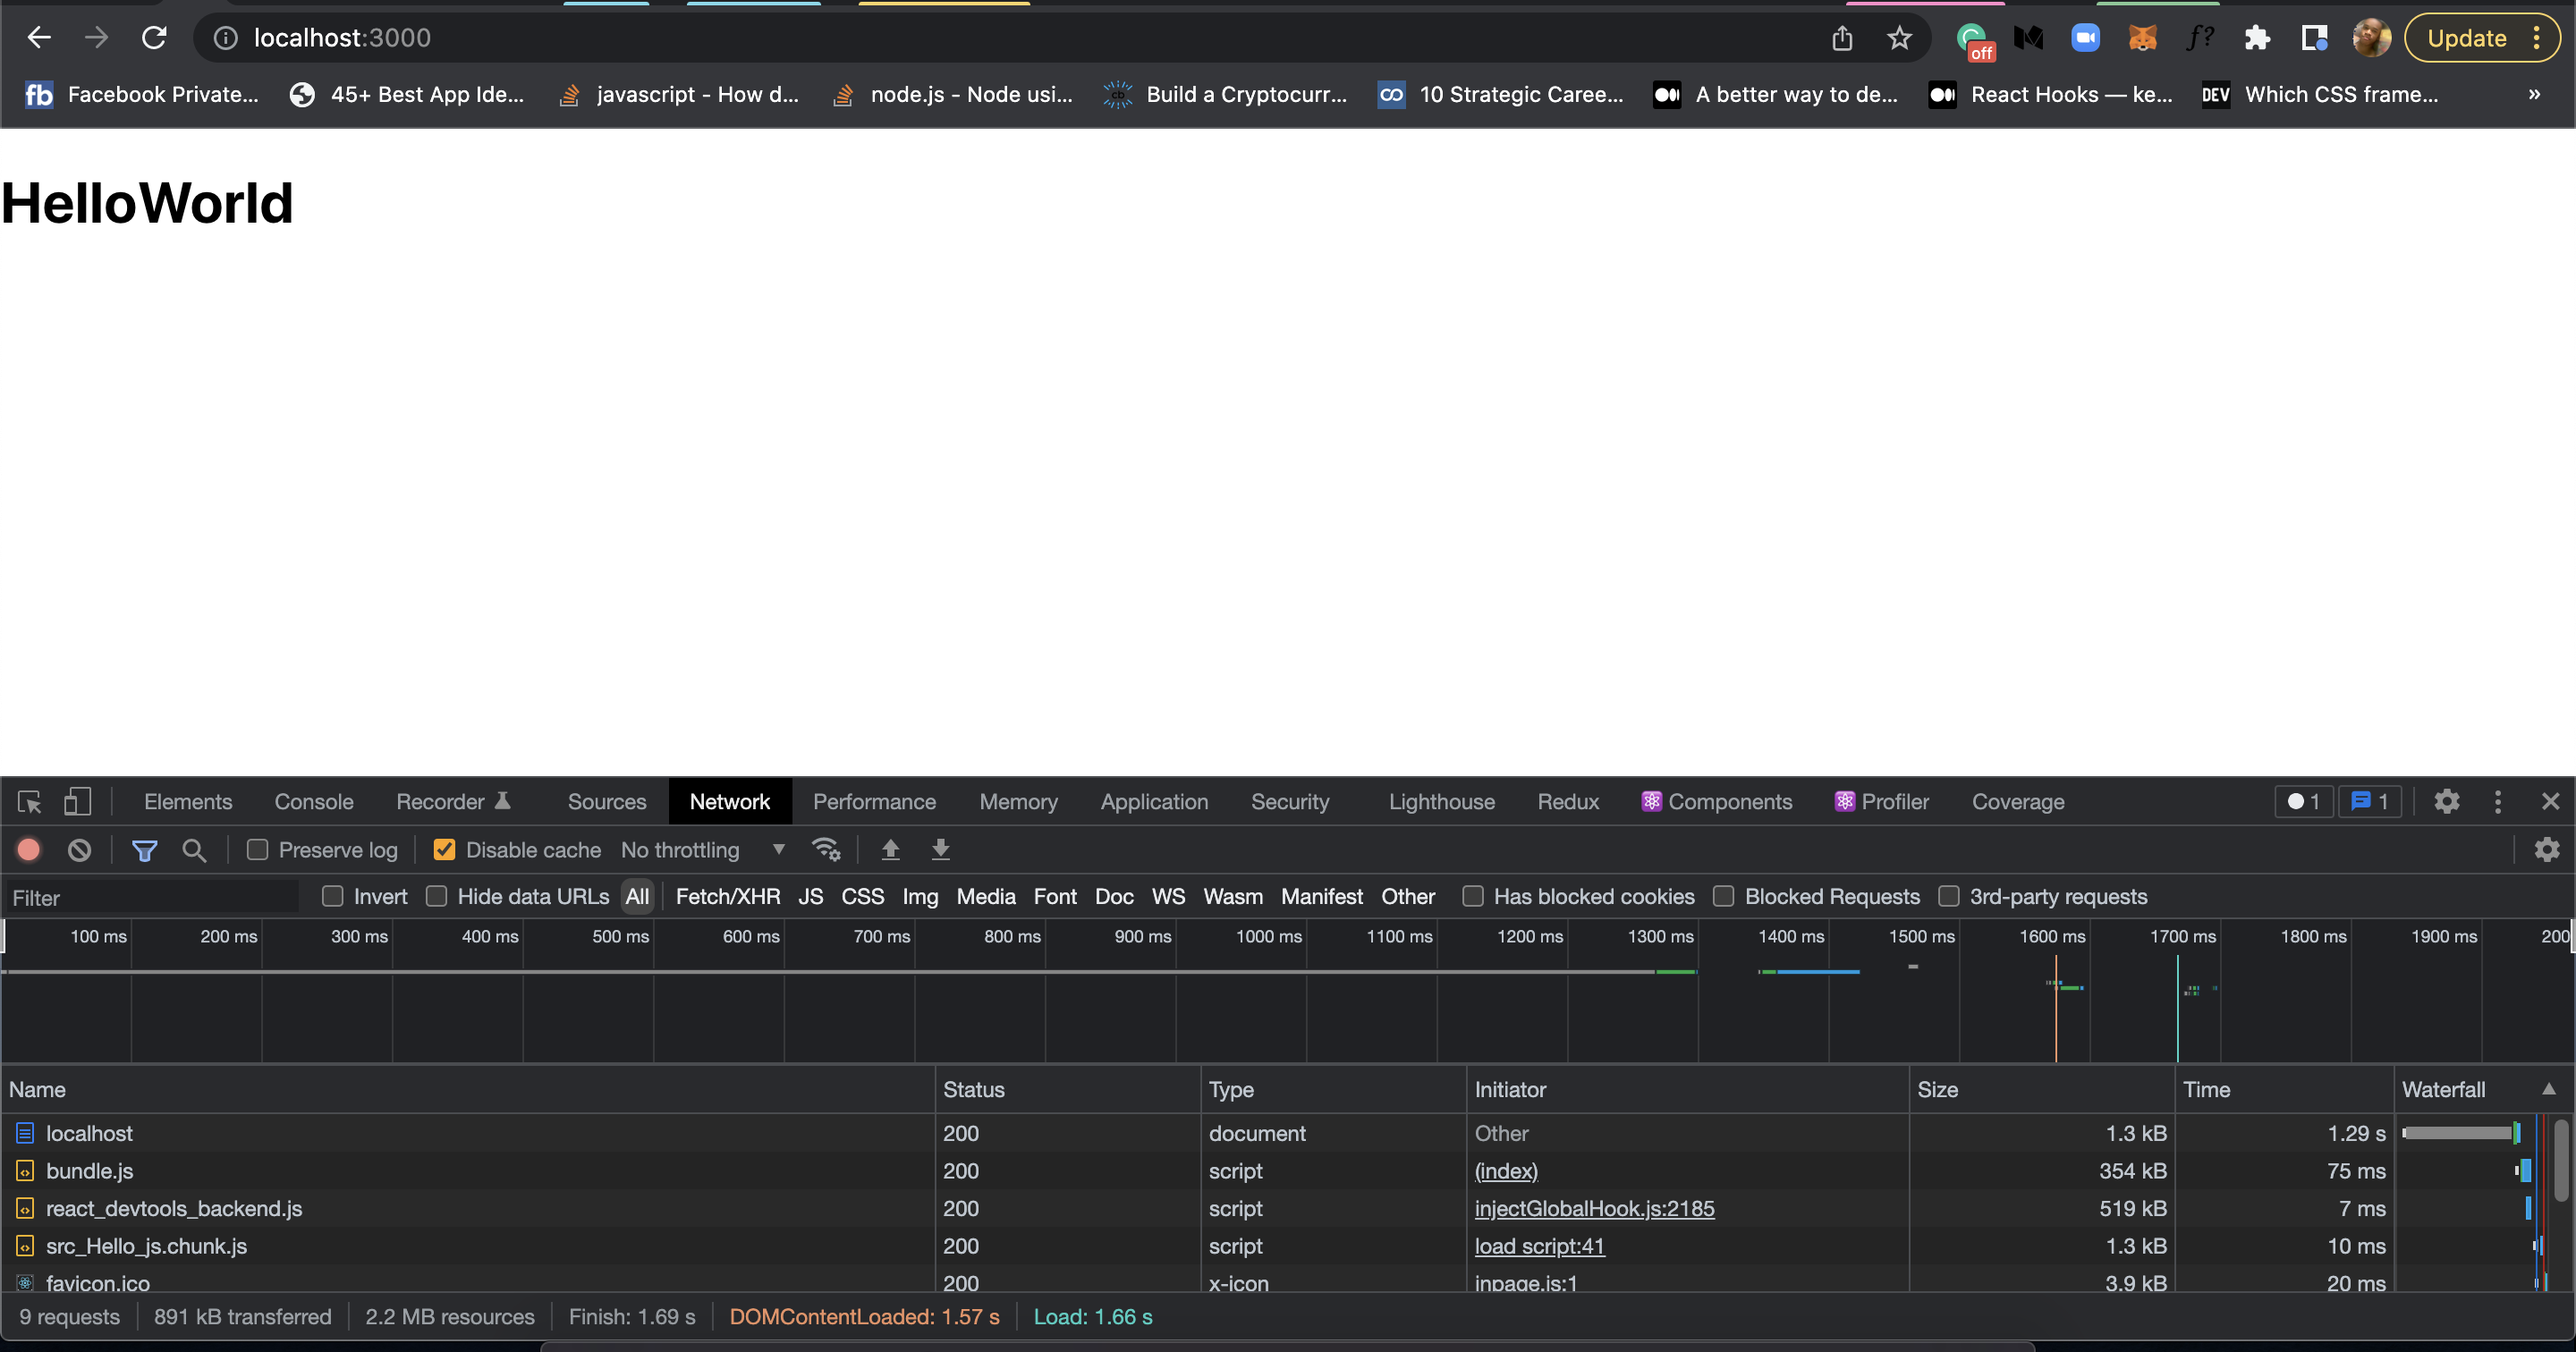
Reload the app. You will see the Hello World displayed. Go to the "Networks" tab in the DevTools.

See that we have src_Hello_js_chunk.js file. This is the JavaScript code of the Hello component. The Hello component was separated from the bundle.js file and then added to the src_Hello_js_chunk.js file.
Now one of the disadvantages of code splitting is that it will generate a lot of files and this will cause constant network requests. This is still a performance bottleneck. What we have to do to reduce the network requests is to not load the lazy-loaded components until they are needed. They are loaded during the user interaction with the app and the loading is done in the background.
Using loading in Suspense
The Suspense component loads the lazily-loaded component. Now, there will be a time when the network will be slow or glitchy and the component will take a long to load. In this our present example, the user does not know that the component in the page is still loading. We need to set up a progress indicator to let the user know that the component is still loading.
The Suspense supports this by utilizing the fallback prop. The fallback prop is a component that will be rendered while the component is loading.
Let's see an example:
The full code:
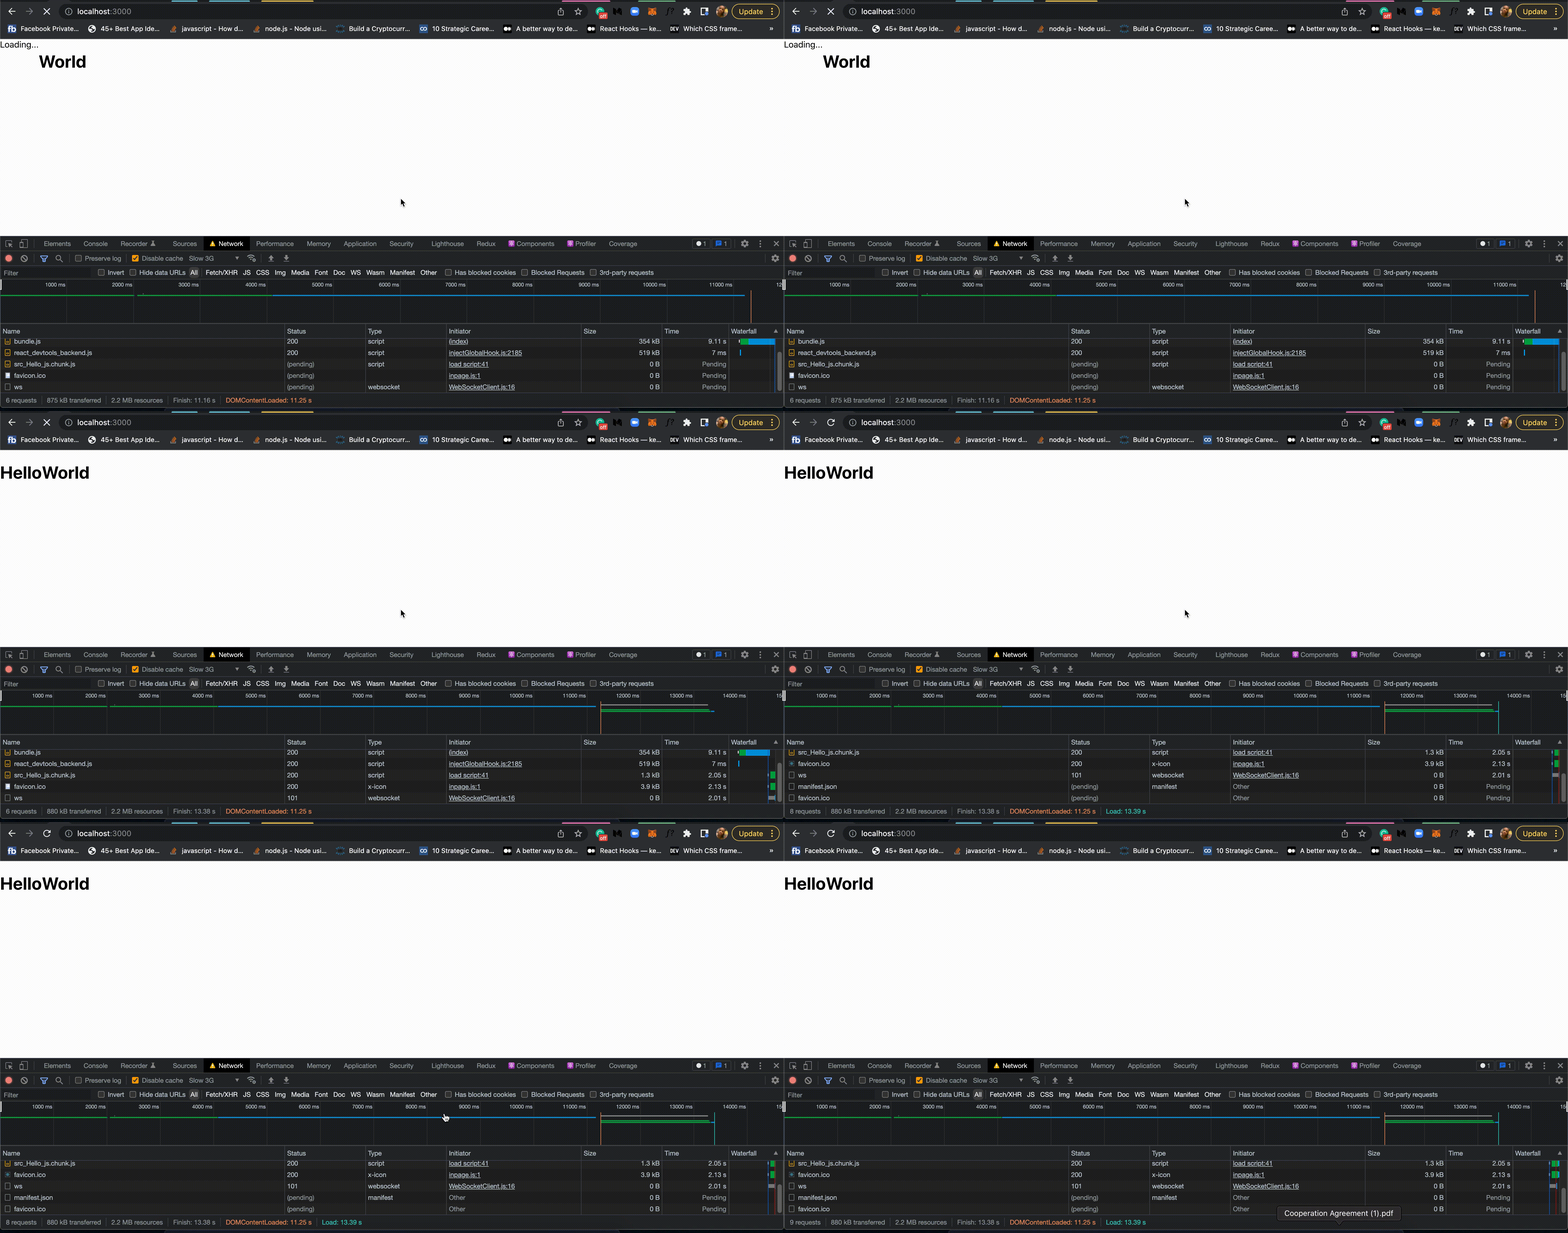
To see the progress indicator, reload the app in your browser. You will see the progress indicator. You didn't see the Loading... text, right? :) It's because it was very fast. We need to simulate a slow network. Click on the "No throttling" button in the Network tab, and select "Slow 2G". Now, reload the page. You will see the progress indicator, "Loading..." alongside "World". After some time you will see the complete text "Hello World".

Suspending multiple components
We only used a single component in our examples, but the Suspense component can be used to suspend multiple components. Let's see an example:
Here, we have two components inside the Suspense component. The Suspense component will load the components asynchronously.
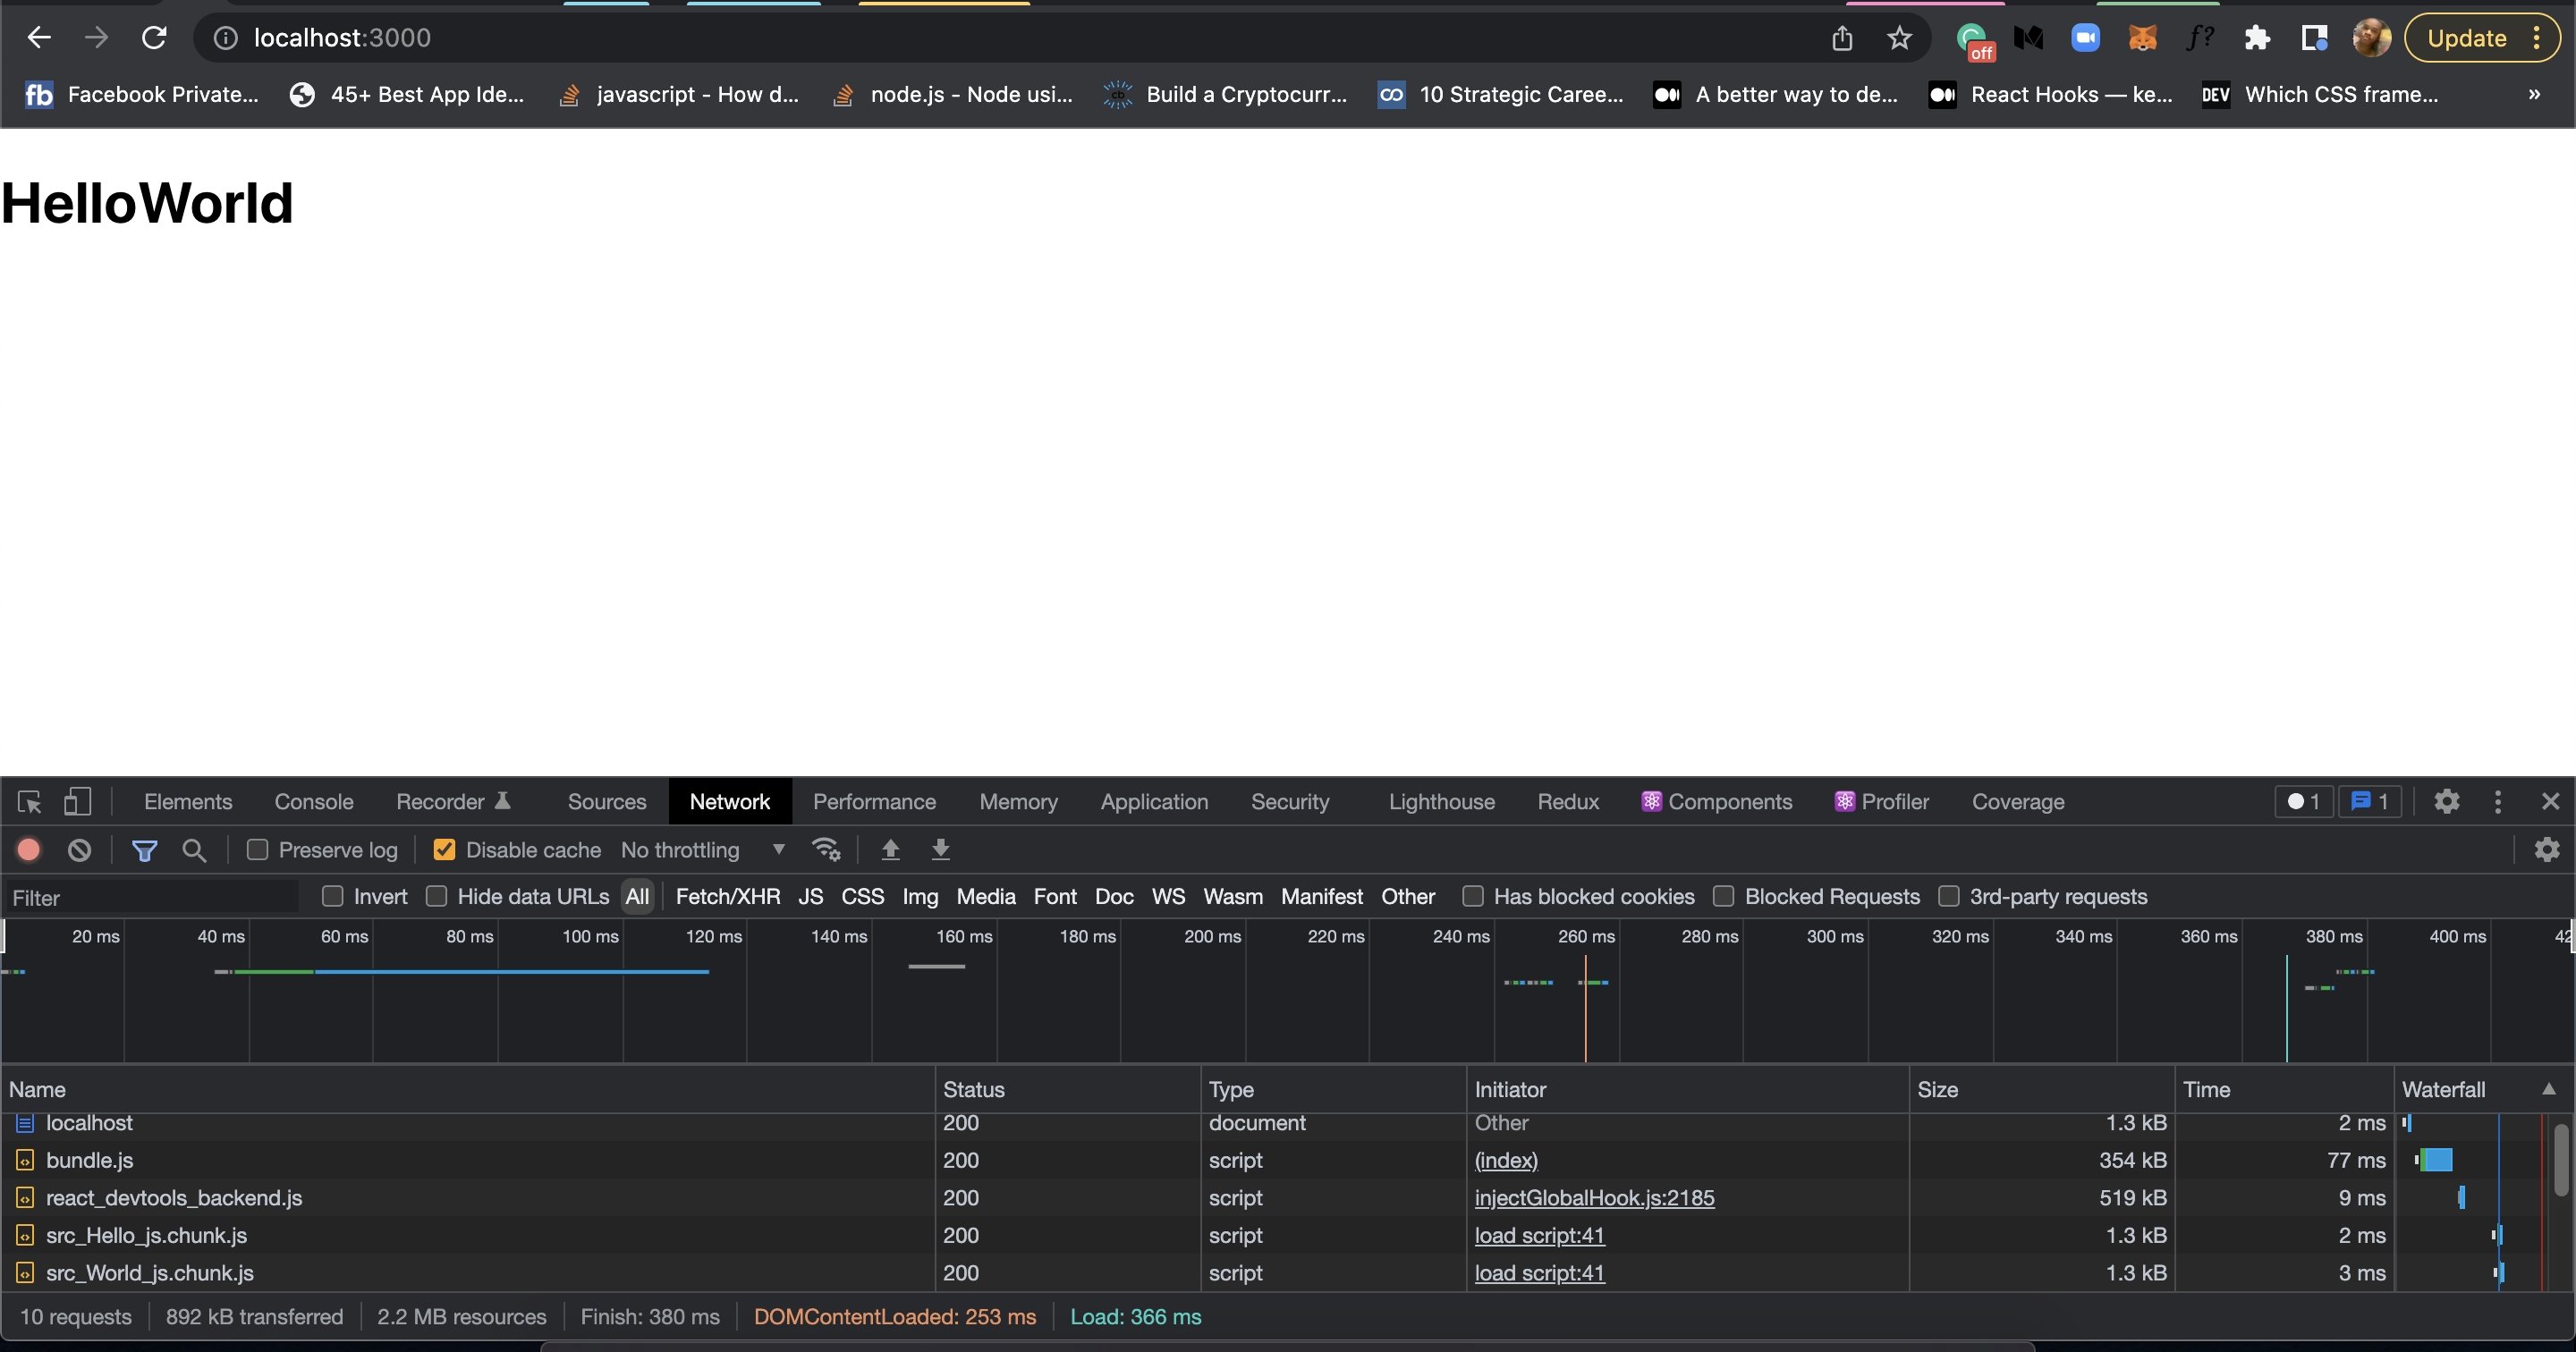
Reload your browser and in the Network tab, you will see: bundle.js, src_Hello_js_chunk.js, and src_World_js_chunk.js. The src_Hello_js_chunk.js and src_World_js_chunk.js files are the JavaScript code of the Hello and World components respectively.

The src_World_js_chunk.js was created when we lazily loaded the World component.
We see that the Suspense component can be used to suspend multiple components.
Handling load failure in Suspense
What if the component fails to load? What if the component is not available? We need to handle this case. When the component fails to load, the Suspense component will have to render the fallback component or display the failure to the user and a message on what to do to resolve it e.g to reload the page.
To set up a failure scenario, we need to use an Error Boundary component. The Error Boundary component is a component that will catch the error and display a message to the user.
This is an error boundary component. It catches the error and displays a message to the user. If there is an error in any of its children elements the hasError state will be set to true. The getDerivedStateFromError lifecycle method makes sure of this, it is called when an error occurs in the children components of the component.
So we will now enclose our Suspense and lazy components with this ErrorBoundary component.
Whenever an error occurs in the Suspense, Hello or World component, the ErrorBoundary component will catch the error and display the message Error! Please reload. to the user.
So we have seen how we can handle failure in Suspense component.
Comparison of React.lazy and @loadable/component
The @loadable/component is a library that is used to lazy load components in React. It does the same job as React.lazy but it is more powerful.
With React.lazy, we must enclose our lazy-loaded component with a Suspense component. With @loadable/component, it is not required to enclose the lazy-loaded component with a Suspense component.
The @loadable/component supports more features than React.lazy. The @loadable/component supports server-side rendering of the components but we can't do that with React.lazy. Also, the @loadable/component supports library splitting. We can split a library dependency in our project out of the bundle. We can't do that with React.lazy, it must be a component.
The @loadable/component also supports full dynamic import. This dynamic import enables us to pass a dynamic value to the dynamic import() function.
All component files matching the pattern ./{page} will be split out of the bundle.
This will code split the Home and Contact components.
Conclusión
We have seen how to use React.lazy to lazy load components and the importance of code-splitting our components to achieve optimal performance in our app. We have also seen how to use Suspense to suspend multiple components. We have also seen how to use ErrorBoundary to handle failure in Suspense component.
Lastly, we compared React.lazy and @loadable/component and we saw that the @loadable/component is more powerful than the React.lazy.
Note that code-splitting early is not advisable. Make your applications work first, then you identify the parts that need to be split.
Añada afiliaciones a su proyecto Webflow en cuestión de minutos.
Más de 200 componentes Webflow clonables gratuitos. No es necesario registrarse.
Añade membresías a tu proyecto React en cuestión de minutos.

.webp)


.png)
